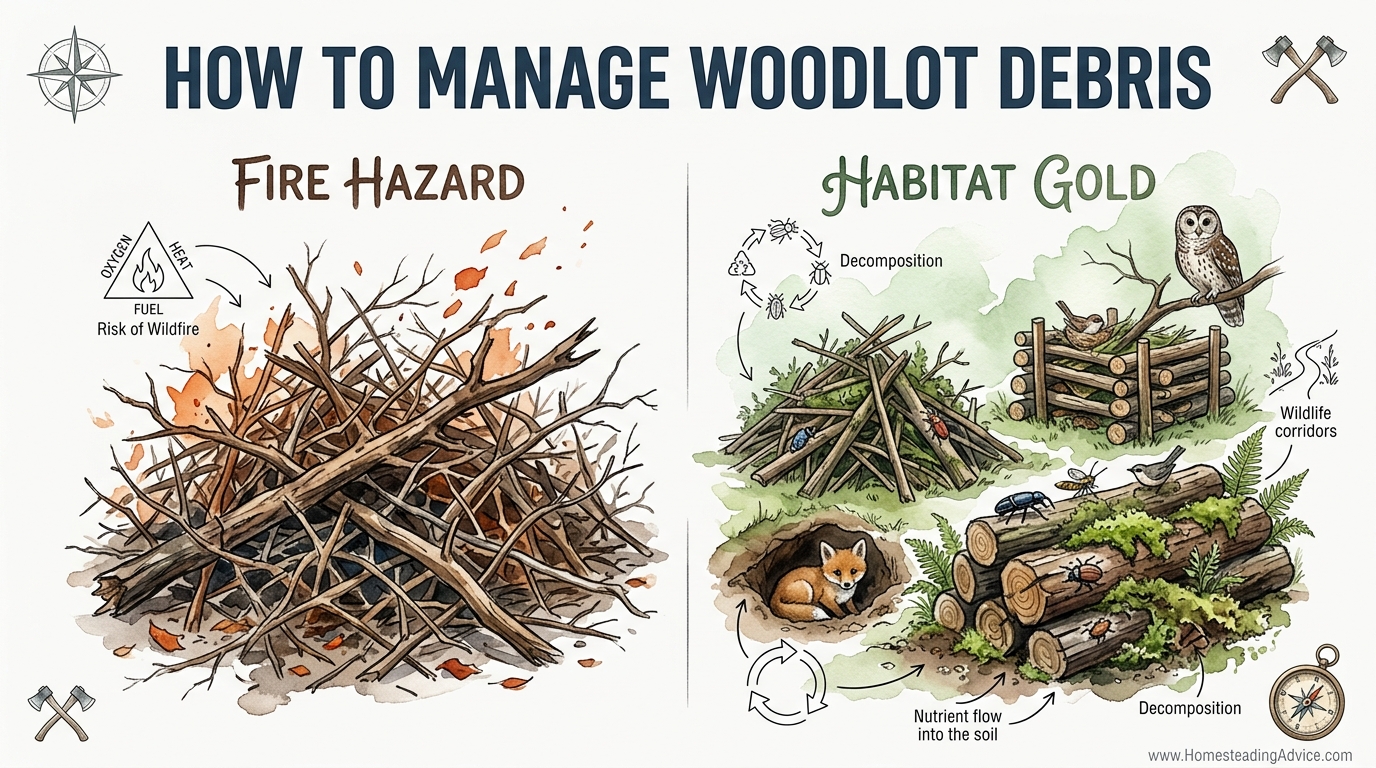
That pile of ‘trash’ branches is either a liability waiting for a spark or the biological engine of your forest’s future. Most woodlot owners see a fallen branch as a chore. The pros see it as a high-performance habitat factory. Learn why ‘cleaning’ your woods might actually be starving it of the life it needs to thrive.
Woodlot management often feels like a constant battle against gravity. Every storm and every season seems to dump a new layer of sticks, limbs, and trunks across the forest floor. The instinct for many is to rake it up, burn it, or haul it away to make the woods look “neat.” However, true stewardship recognizes that a tidy forest is often a dying one. Real woodlot health depends on the presence of decaying organic matter, which acts as a slow-release fertilizer and a multi-story apartment complex for wildlife.
Understanding the balance between fire hazard and habitat gold is the key to mastering your land. You do not need to choose between a safe woodlot and a wild one. With a bit of ancestral wisdom and some modern ecological insight, you can turn your debris into a productive asset. This guide will walk you through the practical steps of managing forest “waste” to build soil, support life, and protect your property.
How To Manage Woodlot Debris
How to manage woodlot debris effectively starts with changing how you define the material on the ground. Forestry professionals categorize this material into two main groups: Coarse Woody Debris (CWD) and Fine Woody Debris (FWD). Coarse debris generally includes logs and large branches with a diameter greater than 7.5 cm to 10 cm (3 to 4 inches). Fine debris includes the smaller twigs, leaves, and “slash” left over from pruning or natural falls.
In the real world, managing these materials involves strategic placement rather than total removal. Instead of seeing a fallen oak limb as a mess, think of it as a structural component. Large logs that stay in direct contact with the soil act as “nurse logs,” holding moisture like a sponge during summer droughts and providing a cool, damp environment for essential fungi and salamanders. Small twigs and brush, when piled correctly, offer immediate protection for ground-nesting birds and small mammals.
The goal of debris management is to mimic the natural cycles of a healthy, old-growth forest. In those ancient stands, dead wood can make up to 30% of the total woody biomass. This material is not “waste”; it is a massive reservoir of carbon and nutrients. By managing your woodlot debris, you are essentially managing the long-term fertility of your soil and the biodiversity of your entire ecosystem.
The Mechanics of Building Habitat Piles
Building a wildlife habitat pile is a deliberate construction project, not just a heap of sticks. To create a structure that lasts and truly serves the local fauna, you must follow a specific layering process. This ensures the interior remains open and accessible to animals while the exterior provides protection from wind, rain, and predators.
The Foundation Layer
The base of your pile is the most critical part. You want to use your largest, most rot-resistant logs for the foundation. Species like cedar, locust, or oak are ideal because they provide a sturdy framework that won’t collapse quickly. Lay four or five of these logs—roughly 1.8 to 2.4 meters (6 to 8 feet) long—parallel to each other, spaced about 25 cm to 30 cm (10 to 12 inches) apart.
Once the first layer is down, place a second layer of slightly smaller logs perpendicular to the first. This “log cabin” style construction creates large cavities at the ground level. These openings are perfect for rabbits, foxes, or even hibernating reptiles. If you have large rocks or old stumps, you can incorporate those into the base to add even more structural diversity and thermal mass.
The Mid-Section and Topping
After the base is established, you can begin adding the lighter “brush” material. Layer limbs and branches loosely across the top of the log cabin base. It is important to avoid packing the material too tightly; you want to leave open pockets that allow birds like chickadees or wrens to flit in and out.
The final layer should consist of fine twigs and perhaps some evergreen boughs. This dense “thatch” on the top acts as a roof, shedding some of the rain and keeping the interior of the pile drier and warmer than the surrounding forest. A well-built pile should stand roughly 1.2 to 1.8 meters (4 to 6 feet) tall and be about 3 to 4.5 meters (10 to 15 feet) wide.
Strategic Placement
Location is everything when it comes to habitat piles. Placing them near the edge of a woodlot, where the forest meets a meadow or garden, provides a “safe zone” for animals to transition between different habitats. Aim for a density of about 3 to 4 piles per acre (0.4 hectares). To manage fire risk, ensure these piles are at least 30 meters (100 feet) away from any human structures and well-spaced from one another to prevent a “ladder” of fuel that could lead into the tree canopy.
Benefits of Managed Debris
Leaving wood to rot might seem passive, but the measurable benefits to your woodlot are immense. By strategically managing debris, you are performing a service that no amount of synthetic fertilizer or commercial landscaping can replicate.
* Soil Fertility and Moisture Retention: As logs decompose, they release nitrogen, phosphorus, and potassium back into the earth. They also act as massive sponges. A large, decaying log can hold several times its weight in water, which helps the surrounding trees survive periods of low rainfall.
* Biodiversity Support: From the fungi that break down the lignin to the woodpeckers that hunt for beetles in the bark, dead wood is the foundation of the forest food web. Small mammals use the piles for nesting, which in turn supports predatory birds like owls and hawks.
* Erosion Control: Logs placed across a slope—a technique often called “contour felling”—can slow down runoff and trap sediment. This prevents valuable topsoil from washing away during heavy rainstorms.
* Natural Regeneration: Many tree species, particularly heavy-seeded hardwoods like oak and hickory, find the perfect “nursery” conditions within a slash pile. The brush protects young saplings from being over-browsed by deer, giving the next generation of your forest a fighting chance to reach the canopy.
Challenges and Common Mistakes
The biggest mistake woodlot owners make is creating “accidental” hazards. Simply throwing branches into a messy heap without a plan can lead to several problems that are difficult to fix later.
The Fire Ladder Trap
If you pile debris directly under the low-hanging branches of living trees, you create a “fire ladder.” In the event of a ground fire, the flames can climb up the debris pile and ignite the tree canopy, turning a manageable fire into a catastrophic crown fire. Always build your piles in natural openings or clearings, well away from the “drip line” of valuable standing timber.
The Aesthetic “Mess”
Neighbors or local authorities may sometimes view habitat piles as a sign of neglect. This is why “dead hedging” is such a valuable alternative. By stacking debris between upright posts to create a tidy-looking fence, you provide the same habitat benefits while signaling that the woodlot is being actively managed. It transforms a “mess” into a purposeful structure.
Invasive Species Hiding Spots
Brush piles can sometimes become nurseries for invasive vines like Oriental bittersweet or English ivy. These plants love the structural support and the nutrient-rich environment of a pile. It is essential to monitor your piles once or twice a year and pull out any invasive hitchhikers before they use the pile as a launching pad to climb into your trees.
Limitations: When Removal is Necessary
While most debris should stay, there are specific situations where the only responsible choice is to remove or burn the wood. Recognizing these limits is part of being a professional-grade woodlot manager.
* Disease Outbreaks: If your trees have died from highly contagious pathogens like Dutch Elm Disease or Oak Wilt, leaving the wood on the ground can help the fungus spread to healthy neighbors. In these cases, the wood should be debarked, burned on-site, or hauled away to a secure facility.
* Extreme Fuel Loads: In regions prone to high-intensity wildfires, leaving too much fine debris (twigs and leaves) can be dangerous. If the forest floor is covered in more than 5 cm to 10 cm (2 to 4 inches) of dry, fine material, you may need to “lop and scatter” it to speed up decomposition or perform a controlled pile burn during the wet season.
* High-Traffic Areas: Near trails, roads, or property boundaries, large debris can be a tripping hazard or a liability. In these zones, it is better to move the material deeper into the woodlot where it can do its work without being an obstacle.
Habitat Piles vs. Dead Hedging
Choosing between a standard brush pile and a dead hedge depends on your goals for the woodlot. Below is a comparison to help you decide which technique fits your specific needs.
| Feature | Habitat Pile | Dead Hedge |
|---|---|---|
| Primary Purpose | Core wildlife shelter and denning. | Boundary marking and windbreaks. |
| Complexity | Low; simple stacking required. | Medium; requires vertical posts. |
| Aesthetics | Looks like a natural mound. | Looks like a rustic, built fence. |
| Durability | High; logs last many years. | Moderate; needs periodic topping up. |
Practical Tips for Best Results
Managing woodlot debris is a marathon, not a sprint. To make the most of your efforts, focus on these field-tested best practices that ensure your work lasts for decades.
* Use What You Have: Do not buy materials. The point of woodlot management is to use the site’s own resources. Use crooked, “wolf” trees or storm-damaged limbs that have no value as timber.
* Time Your Builds: The best time to build piles or hedges is in the late autumn or early winter. This provides immediate shelter for animals looking for a place to overwinter and avoids disturbing nesting birds that are active in the spring and summer.
* Encourage Fungi: If you want to speed up the decomposition of a large log to improve soil health, use an axe to make several deep “V” notches along its length. These notches trap water and give fungal spores a place to land and begin the “digestion” process.
* Protect Your Piles: If you are in a high-wind area, place a few heavy logs on top of your fine brush to keep it from blowing away before it has a chance to settle and interlock.
Advanced Considerations: Biochar and Hugelkultur
For the woodlot owner who wants to go beyond simple habitat creation, debris can be transformed into high-performance soil amendments through advanced techniques like biochar production and hugelkultur.
Small-Scale Biochar
Biochar is a form of charcoal created by burning woody debris in a low-oxygen environment (pyrolysis). Unlike ash, which washes away quickly, biochar stays in the soil for centuries. You can make it in a simple “top-lit updraft” (TLUD) kiln or a small trench. By “charging” this charcoal with compost tea or liquid manure, you create a powerful, long-lasting fertilizer that sequester’s carbon deep in your forest floor.
Hugelkultur: The Mound Garden
If your woodlot borders a kitchen garden or an orchard, you can use your larger debris to build hugelkultur beds. This involves burying large logs under a layer of soil, compost, and mulch. As the logs rot underground, they provide a constant source of heat and moisture for the plants above. A well-constructed hugel bed can support crops for 10 to 20 years without needing any additional irrigation, even in dry climates.
Scenario: The Post-Storm Restoration
Imagine a severe ice storm has swept through your 10-acre (4-hectare) woodlot, leaving several large maples split and hundreds of limbs scattered. Instead of calling a chipper service, you can execute a three-step restoration plan.
First, identify the “hazard trees” near your paths. Fell these and cut the main trunks into 2.4-meter (8-foot) sections. Use these as the base for four new habitat piles in the corners of your property. Second, take the mid-sized limbs and create a 30-meter (100-foot) dead hedge along your northern property line to act as a windbreak. Finally, “lop and scatter” the remaining small twigs. Cut them so they lie flat against the ground, ensuring they touch the soil to speed up decomposition.
In just one weekend of work, you have turned a disaster into a decade’s worth of soil nutrients and a massive boost to your local songbird population. You saved the cost of hauling the wood away and kept the “biological capital” on your land.
Final Thoughts
Managing woodlot debris is an act of partnership with the land. When you choose to stack, pile, or hedge rather than burn or haul, you are acknowledging that the forest knows what to do with its own “waste.” Your job is simply to provide the structure and the safety that allows these natural processes to thrive near your home.
The transformation won’t happen overnight. It takes time for the fungi to move in, for the insects to find the logs, and for the soil to darken with new organic matter. But as the years pass, you will notice the difference. Your trees will look more resilient during dry spells, and the woodlot will be filled with a level of activity and bird song that a “clean” forest simply cannot support.
Start small. Find one corner of your woods today and build a single log-cabin-style pile. Watch it over the seasons. You will soon see that the “trash” you were once tempted to clear away is, in fact, the very heart of your forest’s health. Experiment with these techniques and take pride in the fact that you are building a legacy that will nourish the land long after you are gone.