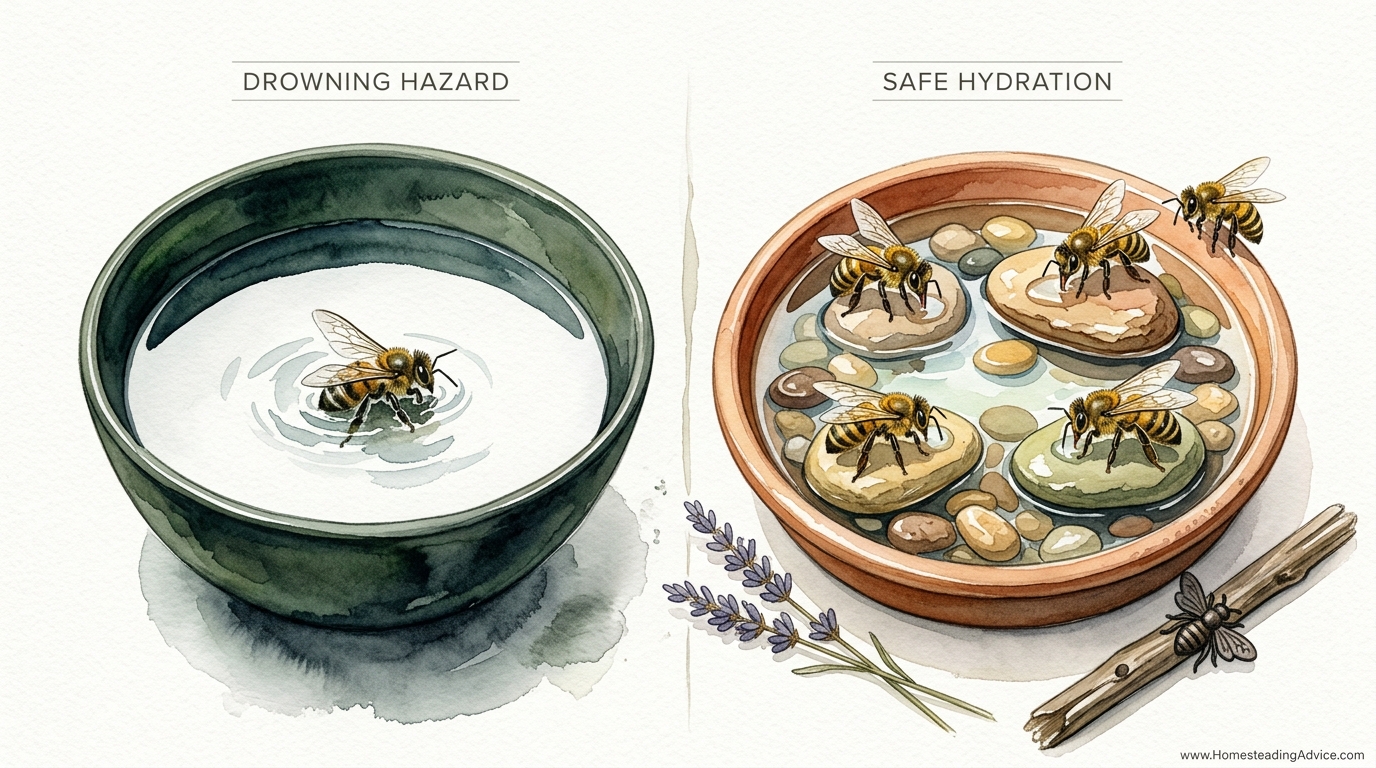
Bees are world-class flyers but terrible swimmers; is your water source a death trap? During a heatwave, bees need water as much as nectar, but they can’t land on open water. A standard bucket or pool is a graveyard for foragers. Creating a ‘sheltered’ hydration station with landing rocks and floating corks ensures every bee returns to the hive instead of ending up at the bottom of a pail.
Water acts as the lifeblood of a honey bee colony, especially during the sweltering months of summer. While we often think of bees as hunters of nectar and pollen, their demand for moisture is just as absolute. They use water to cool their homes, feed their young, and process their winter stores. Without a safe, reliable place to drink, these industrious insects are forced to take risks that often result in exhaustion and death.
The Biological Necessity of Bee Hydration
Honey bees do not just drink water to quench their individual thirst. They are collective creatures, and their water collection serves several vital functions within the hive. One of the most critical roles is thermoregulation. When the internal temperature of a hive rises above 35°C (95°F), the health of the brood is at risk. High temperatures can cause developmental issues or even death for the growing larvae.
To combat this heat, worker bees engage in a form of evaporative cooling. They bring water back to the hive and spread it in thin films over the wax cells. Other bees then fan their wings vigorously, creating a constant airflow that evaporates the water and lowers the temperature. This biological “air conditioning” system is so effective that it can keep a hive cool even when the external sun is punishingly hot.
In addition to cooling, bees require water to dilute crystallized honey. During the winter or early spring, honey can become too thick and sugary for the bees to consume easily. They must mix it with water to reach the correct consistency for digestion and for producing “royal jelly” or “brood food” to feed the queen and the larvae. A hive without water is a hive that cannot grow.
How To Make A Safe Bee Waterer
A safe bee waterer is any hydration station designed specifically to provide access to water while preventing the bees from falling in and drowning. Unlike a birdbath, which typically has deep, open water, a bee waterer uses landing pads—textured surfaces that stay dry or damp above the water line. This allows the bee to stand securely with all six legs on solid ground while extending its proboscis (tongue) into the water.
Creating one of these stations is a simple act of stewardship that can be done with household items. The goal is to provide a “beach” or a “raft” rather than a deep pool. You can use shallow dishes, plant saucers, or even old cake pans as the base. The “magic” happens with the filler materials. These can include river rocks, glass marbles, wine corks, or untreated wood scraps.
In the real world, you will see these stations placed in backyard gardens, near commercial apiaries, or even on urban balconies. Beekeepers use them to keep their colonies healthy, while gardeners use them to ensure that the pollinators visiting their flowers stay safe. A well-designed waterer acts as a beacon for local bees, providing a reliable resource that they will return to day after day once they have scouted its location.
Building the Hydration Station: Step-by-Step
Constructing a safe haven for thirsty bees requires more thought than just filling a bowl. You must consider the physics of surface tension and the landing habits of a flying insect. Here is a guide to building a robust station.
1. Selecting the Reservoir
Choose a shallow container with a wide surface area. A ceramic plant saucer about 12 inches (30 cm) in diameter is an excellent choice because ceramic stays cool and the wide area allows many bees to drink at once. Avoid using deep buckets unless you plan on filling them almost entirely with floating material.
2. Adding Landing Platforms
Fill the container with your chosen landing materials. If using stones, choose textured river rocks rather than smooth, polished marbles. Smooth surfaces can become slippery when wet, causing the bee to slide into the water. Arrange the stones so that the tops extend about 0.5 inches (1.3 cm) above the planned water level.
3. Filling with Water
Pour water into the dish until it reaches about halfway up the stones. The goal is to have “islands” of dry rock surrounded by shallow “canals” of water. This creates hundreds of tiny “shorelines” where bees can perch.
4. Scenting and Mineralizing
Fresh, distilled water is actually less attractive to bees than water with a bit of “character.” Add a tiny pinch of sea salt (about 1/8 teaspoon per gallon / 3.8 liters) to the water. Bees crave minerals like sodium and magnesium, which they need for their own health and for the development of the brood. You can also add a single drop of lemongrass oil to the edge of the dish to act as a pheromone mimic, signaling to scout bees that this is a safe place to visit.
How It Works: The Physics of Bee Safety
Understanding why a bee drowns is the first step toward preventing it. Bees are relatively heavy for their size, and their wings are made of a delicate, chitinous material. When a bee touches the surface of deep water, the surface tension—the “skin” of the water created by molecular attraction—can grab hold of its legs or wings.
Once a bee is caught in surface tension, it is very difficult for it to pull itself free. The more it struggles, the more water coats its wings, making them too heavy to lift. A bee trapped in this manner will eventually die of exhaustion or hypothermia, even on a warm day.
A safe waterer works by eliminating the “open water” problem. By providing landing rocks or floating corks, you provide the bee with a solid substrate. The bee lands on the dry part of the rock and walks down toward the water’s edge. It stops when it reaches the moisture, sips its fill, and then turns around and walks back up to a dry spot to take off. This “walk-in” approach is much safer than attempting to land directly on a liquid surface.
Benefits of a Managed Water Source
Providing a dedicated waterer offers measurable advantages for both the bees and the humans living nearby.
- Reduced Drowning: The most immediate benefit is the survival of the foragers. Each worker bee represents a significant investment of energy and resources by the colony. Keeping them alive ensures the hive stays productive.
- Hive Cooling Efficiency: When bees don’t have to fly miles to find a creek, they can bring water back to the hive more frequently. This allows the colony to maintain a more stable internal temperature during extreme heat.
- Neighborhood Peace: If you have a swimming pool, you know that bees are often attracted to the smell of chlorine and salt. By providing a closer, safer alternative, you can often “train” the bees to stay away from your pool area, reducing the risk of accidental stings for swimmers.
- Pollination Support: A hydrated bee is a healthy bee. By supporting the local bee population, you are indirectly improving the pollination rates of your own garden and the gardens of your neighbors.
Common Mistakes to Avoid
Even with the best intentions, it is easy to make errors that render your waterer useless or even dangerous.
One frequent mistake is using deep containers without enough landing area. If you use a five-gallon bucket and only put a few sticks in it, the vast majority of the surface area remains a drowning hazard. Ensure that at least 80% of the surface area is covered with landing pads.
Another pitfall is letting the water become stagnant or filled with debris. While bees do like “smelly” water rich in minerals, they do not like water that has turned into a fermented soup of dead leaves and mosquito larvae. Clean the container and refresh the water at least once a week. Use a stiff brush and plain water to scrub away algae—avoid using soap or bleach, as the residue can be toxic to the bees.
Placement is also a critical factor. Do not place the waterer directly in front of the hive entrance. Bees often perform “cleansing flights” when they leave the hive, and you do not want them dropping waste into their own drinking supply. Move the station at least 10 to 20 feet (3 to 6 meters) away from the hive to keep the water clean.
Limitations and Environmental Constraints
A managed waterer is a fantastic tool, but it is not a perfect solution for every environment. In extremely dry, arid climates, evaporation happens so quickly that a small dish may dry out in a matter of hours. In these areas, you may need a gravity-fed system, such as a poultry waterer filled with pebbles, to provide a larger reservoir that lasts longer.
Furthermore, the “GPS” of a honey bee is very strong. If a colony has already established a nearby swimming pool as their primary water source, it can be extremely difficult to convince them to switch to your new station mid-summer. It is always best to set out your waterers in the early spring, before the bees have scouted out other locations. Once a scout bee finds a source and does a “waggle dance” to tell her sisters about it, that location is locked into the colony’s collective memory for the rest of the season.
Comparison of Landing Materials
Not all landing pads are created equal. Depending on your budget and what you have on hand, some materials may perform better than others.
| Material | Pros | Cons | Durability |
|---|---|---|---|
| River Rocks | Natural look, provides great traction, doesn’t rot. | Heavy, can be hard to clean. | Excellent (lasts forever) |
| Wine Corks | Floats on top, easy to replace, lightweight. | Can rot over time, may harbor mold. | Moderate (seasonal) |
| Glass Marbles | Very easy to clean, looks attractive. | Can be slippery; doesn’t hold moisture. | High |
| Lava Rock | Porous; sucks up water like a wick. | Edges can be sharp; harder to scrub clean. | High |
Practical Tips for Best Practices
If you want your bee waterer to be the most popular spot in the neighborhood, follow these expert tips.
- Consistency is Key: Bees rely on a stable source. If your waterer goes dry for even a single day during a heatwave, the scout bees will immediately go looking for a new source. Once they find a different one, they may never come back to yours. Keep it filled.
- Partial Shade: Place the waterer in a spot that gets morning sun but afternoon shade. This prevents the water from becoming too hot to drink during the peak of the day. Warm water is fine, but “bathwater” hot can be off-putting.
- Avoid Sugar: Never add honey or sugar to the water. This can lead to “robbing” behavior where bees from different hives fight over the resource, and it can also attract ants, wasps, and other pests. The goal is hydration, not feeding.
- Create a “Mud Zone”: Some native bees, like Mason bees, actually need mud for building their nests. Letting a little water overflow into a patch of dirt nearby can support these solitary pollinators alongside your honey bees.
Advanced Considerations: The Role of Minerals
For the serious practitioner, understanding the chemistry of the water can take your beekeeping to the next level. Research has shown that bees actually prefer water that contains specific levels of sodium, magnesium, and potassium. In many cases, they will bypass “clean” tap water to drink from a murky puddle or a salty pool edge.
Providing a “mineral bar” can be a fascinating experiment. You can set out three different saucers: one with plain rainwater, one with a pinch of sea salt, and one with a small amount of wood ash mixed in. Observe which one the bees prefer. Often, their needs change with the seasons. In the spring, when they are rearing lots of brood, their demand for salt and minerals increases significantly.
Example Scenarios: Managing the Neighborhood Pool
Consider the case of a suburban beekeeper whose neighbors have just installed a saltwater pool. Within days, the neighbors complain that bees are “swarming” the steps of the pool, making it impossible for their children to swim.
In this scenario, simply putting out a bowl of fresh water probably won’t work. The bees have already tasted the salt in the pool and decided it’s exactly what the hive needs. To solve this, the beekeeper should set up a station about 25 feet (7.5 meters) away from the hive in the direction of the pool. This station should be filled with water that has a slightly higher salt concentration than the pool water—perhaps 1 teaspoon of sea salt per gallon (3.8 liters).
By making the “new” source easier to reach and more mineral-rich than the pool, the beekeeper can entice the scouts to redirect the colony’s foraging efforts. Over the course of a few days, the number of bees at the pool should drop as they migrate to the more efficient and safer salt-waterer provided by the beekeeper.
Final Thoughts
Helping bees stay hydrated is one of the simplest and most rewarding tasks you can undertake in your garden. It requires very little investment—often just a spare saucer and some rocks—but the payoff in colony health and neighborhood peace is substantial. By providing a safe landing zone, you are protecting the lives of the foragers who work tirelessly to sustain our ecosystem.
Success comes through observation and consistency. Watch how the bees interact with your waterer and adjust the landing pads if you see any struggling. Keep the water fresh but not sterile, and ensure that the station never runs dry. These small acts of maintenance represent a deeper connection to the natural world and a respect for the ancestral wisdom that teaches us to care for the creatures that provide for us.
As you become more comfortable with these systems, you might find yourself experimenting with different materials or mineral blends. Whether you are a seasoned beekeeper or a casual gardener, providing a safe hydration station is a powerful way to support the resilience of local pollinators. Encourage others in your community to do the same, and together you can turn your neighborhood into a sanctuary for these vital, world-class flyers.